How to Migrate Zarafa to Office 365 Professional Cloud Service?

User Queries: Hi! I was using Zarafa webmail for many years. Due to some official reasons now, we were thinking to migrate Zarafa to Office 365 account. For performing this task, I was looking for an automated solution. But the issue we are facing is that we are unable to find the perfect professional solution for completing this task. Please help us out with this scenario and suggest best solution also. Thanks in advance!!!
– Lennaa, Switzerland
“Hi! I am James. I want to import Zarafa emails into Office 365 webmail but fail to do so. Kindly, someone help me out with this issue. How can I process further? Please let me know regarding some best software solution to solve this issue. Thanks.”
– James, South Korea
Are you guys searching solution to migrate Zarafa to Office 365 just like the above user? But not able to find a perfect solution for this issue. If yes, no need to worry now. In this blog post, we are going to discuss the same issue in brief. Read the complete blog carefully.
Before proceeding further let’s have a look at what is Zarafa.
What is Zarafa?
Zarafa is open-source software, which is basically designed to facilitate collaborative working. It offers multiple different services like emailing, calendaring, audio conferencing, and contact syncing with MS Outlook clients. Kopano can be used as an email client or Web Application as well. Still, it has some limitations which force users to migrate emails from Zarafa to Office 365.
Best Solution for Zarafa to Office 365 Migration
The best way to perform this task is by using BitRecover Zarafa Migration Tool
It is the best software to migrate Zarafa to Microsoft 365 account in a healthy way. The tool has a very easy–to–use and straightforward graphical user interface. It is an efficient application for solving Kopano to Office 365 migration issues. Definitely, users will not face any issues by using this software. It will help them in completing the task.
The main thing about this utility is it has two versions i.e., the free demo version and paid version. The trial version of this tool is totally free of cost. By using this users can easily migrate 25 emails into Office 365 webmail from each folder. It will help users in deciding that whether they want to use the paid version of the application or not.
After satisfaction user can purchase the licensed keys of the application. In this users will be able to migrate unlimited emails and will also get more benefits.
Benefits of Using Kopano to Microsoft 365 Migrator
There are multiple benefits of using this application, which will help users in performing this task easily:
- Migrate Zarafa to Microsoft 365 primary, in-place archive, and shared mailboxes.
- The tool has a separate option to migrate Zarafa emails into default O365 folders.
- This software maintains the actual folder hierarchy structure during completing the process.
- Advance filter options permit to migrate Kopano to Microsoft 365 by date range, email id, and email subject.
- It keeps all email items, components, attributes, and attachments during the migration.
- Migrate unlimited emails from Kopano to Microsoft 365 at once without size limitations.
How to Move Zarafa to Office 365 Account?
Follow the below–mentioned simple steps to complete this task without facing any issues:
To complete this task user, have to go through two procedures. Let’s have a look at both processes.
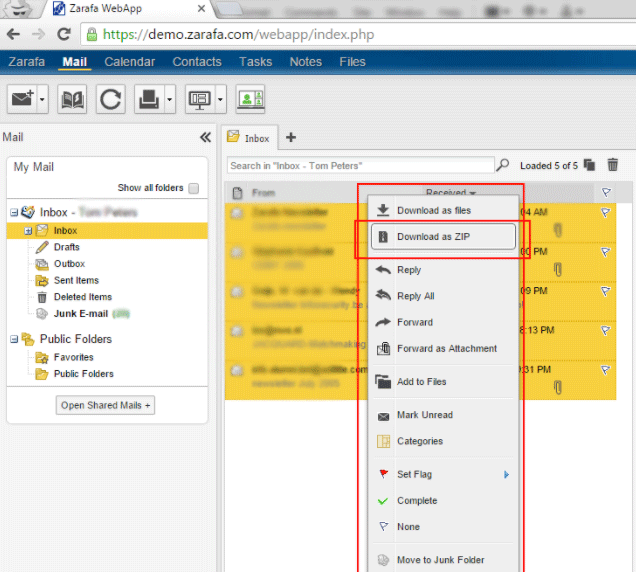
Step 1: Export Zarafa Emails into EML File
- Firstly, log in to the Zarafa account by entering login credentials – its login ID and password.
- After that, select the required Zarafa emails which you want to move to office 365. Right-click and select Download as a ZIP file.

- All the selected files will start downloading in Zip file, and thereafter extract Zip file and get EML files. In the upcoming section, you need to import EML to Office 365 for completing this query.
Step 2: Import Downloaded Zarafa Emails in O365
- Start Zarafa to Office 365 Migration Tool on your machine and read the instructions.

- Use the Select Files or Select Folders option for adding Zarafa emails in GUI.
- Then, select email folders and click on Next to continue the procedure.

- Now, select the Office 365 saving option from the given saving list.

- After that, enter the login credentials of your Office 365 account – ID & Password.

- Thereafter, press the Backup button to start Kopano to Office 365 migration.
- The process to migrate Zarafa to Office 365 has been finished successfully.
- Now login to your M365 account and see imported email messages.


Reasons to Migrate Zarafa to Microsoft 365
There are multiple reasons behind this moving procedure. Here we’ll explain some of the common reasons. Have a look at them:
- Using Zarafa is quite difficult for non-technical customers. It will become difficult for them to tackle the information related to Zarafa.
- Zarafa / Kopano stores the entire mailbox data on the server but, data breaches, hijacking of accounts, malware injection, etc., are some serious cloud security concerns included in this. These factors make Zarafa users less secure while using it.
- By using Office 365 it becomes simple for clients to deal with bigger organizations.
- If users select to migrate Kopano to Office 365, they will get several online utilities of Office items like Word, Excel, PowerPoint, etc.
- Managing multiple data items and other services using Zarafa is a little complex for users.
Wrapping Up
In the above post, we have briefly mentioned the solution to migrate Zarafa to Office 365. Users facing issues in this process can easily overcome this task by referring to this blog post. By using the steps mentioned here user can meet all their requirements easily. We will recommend this blog to our users for having a trouble-free procedure. Also, users will not have to face any kind of data loss scenario if they select to use this procedure.
This process is discussed in simple ways so that non-technical users will not have to face any issues in completing this task or understanding this process.
