How to Migrate Emails from Qmail to Office 365 Account?

Qmail is a popular email transfer agent that facilitates users to transfer mailboxes or with the help of a client-server architecture. Earlier it was programmed as a safe alternative to Sendmail, which was influenced by security bugs. Since, users are now attracted towards the new technologies and services. Thus, Qmail users are also looking for a reliable solution to migrate emails from Qmail to Office 365 (now Microsoft 365).
In any case, taking a glimpse at the data accessible over the Internet, there is no immediate strategy that can be utilized to move Qmail to Microsoft 365.
In this blog, we will examine how you can migrate from Qmail to Office 365, and furthermore, we will discuss the explanations for moving Qmail to Microsoft 365.
Reasons to Migrate Emails from Qmail to Office 365
There could be a lot of purposes for transferring Qmail to Microsoft 365, yet users generally do it because of the upsides of Microsoft 365, for example,
- Microsoft 365 enables you to work from anyplace as it is a cloud-based application and works absolutely fine with an internet connectivity.
- It gives you admittance to the most recent MS Office applications with no extra charges. Likewise, you get the most recent highlights without purchasing new Office applications.
- Microsoft 365 offers better data protection contrasted with Qmail.
The above reasons obviously characterize why moving to Microsoft 365 has become a need for users and different associations.
How to Migrate Emails from Qmail to Microsoft 365 with Attachments ?
Expert Solution – There are plenty of methods available over the web to migrate emails from Qmail to Office 365 with attachments. But, if we talk about reliability, swiftness and ease then BitRecover IMAP Mail Backup Tool is a well-suited choice. It can be utilized to move Qmail mailboxes to Microsoft 365 in a direct manner with the benefit of applying specific filters to Qmail database for selective email migration.
Please Note – Keep in mind before using this software
Minimum Hard disk space – 48.7 MB
RAM required – 512 MB
Moreover, the tool offers an efficient process with lesser steps, that comprises:
Step 1- Download the Qmail to Office 365 migration software on your Windows machine. If you are a Windows user, then hit on the Windows download button otherwise if you are a Mac user, then hit on the Download for Mac button.
Download for Windows OS


Download for Mac OS
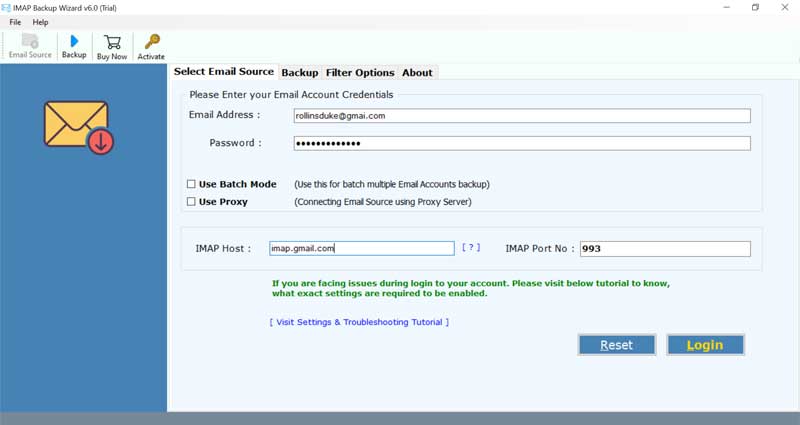
Step 2 – Now, enter the details of the Qmail server account – your IMAP Server, Port No., User Name, Password.
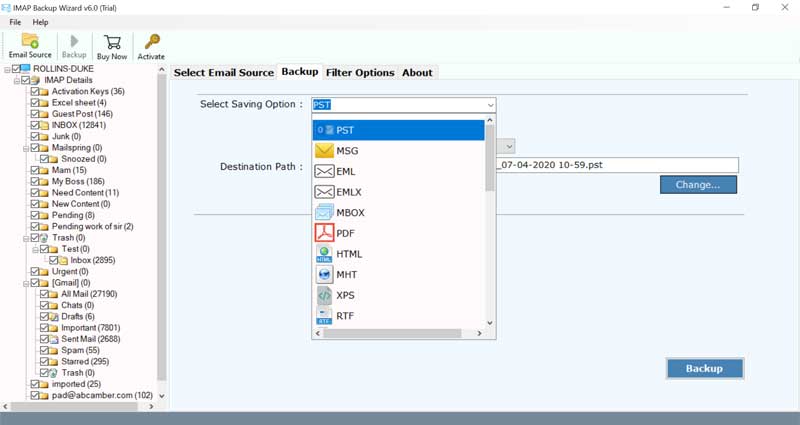
Step3 – Then, select the folders from your Qmail server which you want to transfer from Qmail server to Office 365 account.
Please Note – Enable the “I am Admin” option if you are an Admin. It helps to perform multiple account mapping. For using the user accounts, please ensure that Application Impersonation, as well as mailbox delegation, is allowed.
Step4 – Thereafter, from the saving options list, choose the Office 365 option. Now, specify the Office 365 credentials in the software panel to migrate from Qmail to Office 365.

Step 6 – After this, click on the Next button to start to transfer emails from Qmail to Microsoft 365 account.

Move Qmail to Microsoft 365 – Benefits & Features of Software
The tool comes with various benefits that makes it one of the most useful application to migrate emails from Qmail to Office 365. Some of the important key points of the software are:
- The full pro version of this software allows to migrate from Qmail to Office 365 without any limitations.
- Throughout the process to transfer emails from Qmail to Microsoft 365, the tool maintains the integrity of data.
- Users can move multiple emails from Qmail to Office 365 in a single processing.
- It provides facility to migrate multiple Qmail server accounts to Office 365 with the batch mode option.
- This utility facilitates to transfer mailboxes from Qmail to Office 365 along with all associated attachments.
- The application never saves your Qmail server details in the database of software.
- It offers a free trial version which one can utilize for evaluating the tool’s features.
- Both Windows and Mac users can access the Qmail to Office 365 migration tool without any hassle.
- It comes with a simple and user-interactive interface that helps anyone to utilize it effectively.
- One can selectively migrate Qmail mailboxes to Office 365 account.
Common FAQs – Qmail to Microsoft 365 Migration Tool
Q1 – How to migrate emails from Qmail to Office 365 account?
Follow these steps to migrate from Qmail to Office 365:
- Launch Qmail to Office 365 migration tool.
- Enter the account details of Qmail server and hit on login tab.
- Enable the desired Qmail server folders to move into Office 365.
- Choose Office 365 saving option and enter the O365 login details.
- Start to transfer emails from Qmail mail server to Microsoft 365.
Q2 – Does the software permits the users to selectively move Qmail mailboxes to Office 365?
Ans – Yes, the utility gives ability to the users for selective email migration from Qmail to Office 365.
The Closure
In the above blog, we have explained how to migrate emails from Qmail to Office 365 account. The tool has the proficiency to move from Qmail to Microsoft 365 account with attachments. We have elaborated a professional approach for transferring Qmail server to O365. This suggested application suits best for technical as well as novice users. If you have further queries, please contact to our technical support team.
