How to Fix “VirtualBox No Bootable Medium Found” Error Safely

Published: January 15th, 2026 • 9 Min Read
Imagine this: You’ve spent the last hour carefully configuring your VirtualBox environment. You’ve allocated the RAM, carved out the hard drive space, and you’re ready to dive into a new operating system. You hit that “Start” button with anticipation, only to be met with a cold, black screen and a blinking cursor:
“Fatal: No bootable medium found! System halted.”
It’s an absolute buzzkill. For many IT enthusiasts and professionals across the globe, this error is a rite of passage. It feels like your virtual computer has amnesia—it’s powered on, but it has no idea where its “brain” (the operating system) is located.
Whether you are trying to test a new Linux distro, run a legacy Windows app, or set up a sandbox environment, this error can halt your productivity in its tracks. But don’t worry—you haven’t broken anything. This is usually a simple communication gap between the VirtualBox software and your virtual disk files.
In this guide, we’re going to break down exactly what this error means, why it’s happening to you, how you can detect it symptomatically and walk through the proven fixes to get your virtual machine (VM) back on track.
What Does “VirtualBox No Bootable Medium Found” Mean?
When you turn on your computer (physical or virtual), a program known as the BIOS/UEFI looks for a device that contains what is called a “bootable medium”. Typically, that bootable medium will consist of a hard drive, CD-ROM, or USB drive, and it contains information related to loading an operating system onto your computer.
Therefore, if VirtualBox produces a “No Bootable Medium Found” error, the message is essentially “I searched everything you told me to find and could not find an Operating System to load.” It’s like trying to start a car without inserting the key into the ignition. Everything else works fine—the engine is fine, the battery is charged—but there’s that one missing piece that keeps it from starting.
Common Causes Behind the Error
Learning the reason behind the “why,” provides clarity on our solution’s approach. The following are some frequently experienced issues:
-
Empty Optical Drive: You created the VM, but forgot to “insert” the ISO file (the digital equivalent of a physical installation CD/DVD).
-
Wrong Boot Sequence: VM is attempting to boot from an empty virtual floppy drive or virtual HDD before attempting to boot from a mounted CD/DVD/ISO.
-
Corrupted ISO or VMDK file: The downloaded file may be incomplete or corrupt.
-
EFI Disabled: Newer operating systems (Windows 11 or newer Linux distributions) require enabling of EFI within the configuration settings.
-
Disconnected Virtual Hard Disk: The .vdi/.vmdk file may be relocated or removed from the virtual controller.
Symptoms: How to identify “No Bootable Medium Found” Error
When VirtualBox cannot locate a valid operating system to boot from, it doesn’t just stop; it usually provides specific visual cues. Recognizing these symptoms early can save you hours of troubleshooting.
-
The “System Halted” Black Screen: The most common symptom is a black console window displaying the explicit message:
FATAL: No bootable medium found! System halted.This usually means that your VM has gone through all of the available boot priorities and cannot go any further. Resultantly, it has shut down completely. -
Continuous VM Restart Loops: In some cases, your virtual machine will not shut down at all. Instead, it will continually restart itself. During this process you will first see the VirtualBox logo, then you will get a quick glimpse of the text coming up (for example, loading a kernel) and then the virtual machine will restart back to the VirtualBox logo and keep trying to find a disk to boot from, without success.
-
Booting From A Network Using PXE: When a VM cannot find a VDI or ISO file on your drive, it will attempt to boot from the last item in the boot options list i.e. Network. This may lead to error messages indicating a PXE boot failure e.g.
PXE-E61: Media test failureand/orSearching for DHCP server. -
Storage Controller is “Empty” in Settings: In the IDE controller and/or SATA controller section of the VM, rather than seeing a reference to a .vdi virtual disk or an .iso image file in one of the available spaces, you will see the term “Empty” instead.
-
Waiting for an unresponsive Guest OS: If you experience a Guest OS that has stopped responding, the Virtual Machine window may look like it is stuck in an infinite waiting mode with a blinking underscore (_) cursor. The hardware will have been detected. However, it may be the case that the bootable area has got corrupted or has otherwise become unreadable and thus cannot load.
The Quick Troubleshooting Checklist
Before diving into deep technical fixes, run through this “sanity check”:
-
[ ] Did I actually select an ISO file during setup?
-
[ ] Is the location of ISO file accurate in my PC?
-
[ ] Is the ISO file of correct size (e.g., 2GB-6GB for most OSs)?
-
[ ] Did I try restarting the VirtualBox application?
Step-by-Step Manual Fixes for VirtualBox Errors
If the checklist didn’t solve it, let’s roll up our sleeves. Follow these solutions in order.
Fix 1: Mount the ISO Image (The Most Common Fix)
Most of the time, the VM is simply empty. You need to point VirtualBox to your installer file.
-
Open VirtualBox and select your VM.
-
Click on Settings (the gear icon).
-
Go to the Storage tab on the left.
-
Under the “Storage Devices” tree, look for the Controller: IDE or Controller: SATA.
-
Click on the Empty icon with the disc symbol.
-
On the right side, click the small blue disc icon next to “Optical Drive.”
-
Select “Choose a disk file…” and browse to your downloaded ISO (e.g.,
ubuntu-24.04.isoorWindows10.iso). -
Click OK and start your VM again.
Fix 2: Adjust the Boot Order
If you have a hard drive and a CD drive attached, VirtualBox might be trying to boot from an empty hard drive first.
-
Go to Settings > System.
-
In the Motherboard tab, look at the Boot Order list.
-
Ensure Optical is at the top of the list (using the up arrow).
-
Ensure Hard Disk is second.
-
Click OK and try booting again.
Fix 3: Enable EFI (For Modern OS)
If you are installing Windows 11 or a modern version of macOS/Linux, the old-school BIOS mode won’t work.
-
Go to Settings > System.
-
In the Motherboard tab, check the box that says “Enable EFI (special OSes only)”.
-
Click OK and restart.
Limitations of Manual Fixes
While the steps above solve 90% of cases, they are still not foolproof. Manual troubleshooting come with its own set of limits:
-
Corrupted File: If your virtual disk (.vdi) file itself is in a corrupted state, no change(s) in the VM settings can fix it.
-
Data Loss: If you accidentally deleted a partition inside the virtual disk, VirtualBox will see it as “non-bootable.”
-
Complex Errors: Sometimes the VirtualBox host software itself has conflicts with Windows Hyper-V or system permissions that are hard for novices to track down.
-
No Recovery: Manual fixes don’t help you get your files back if the virtual machine crashed and won’t open again.
When Manual Fixes Fail: The Professional Way to Recover
Have you gone through every step available and still have a VM that will not boot? Even worse, is there important data trapped inside that .vdi or .vmdk file that needs urgent retrieval? Stop guessing what to do.
When manual troubleshooting reaches a dead end, professionals turn to specialized tools like the BitRecover VDI Recovery Software.
This software enables users to recover data from the inaccessible and corrupted virtual disks that become unbootable due to filesystem damage and result in the error – “No bootable medium found”. Users need only scan their disk to recover significant data from their virtual disk without additional configuration or setup.
Why choose BitRecover for VirtualBox errors?
-
It recovers data from corrupted, deleted, or formatted virtual partitions.
-
Supports
.vdi(VirtualBox),.vmdk(VMware), and.vhd/.vhdx(Hyper-V). -
No need to have VirtualBox installed to recover your files.
-
User-friendly interface designed for non-techies.
Simple Recovery Steps Using BitRecover Software
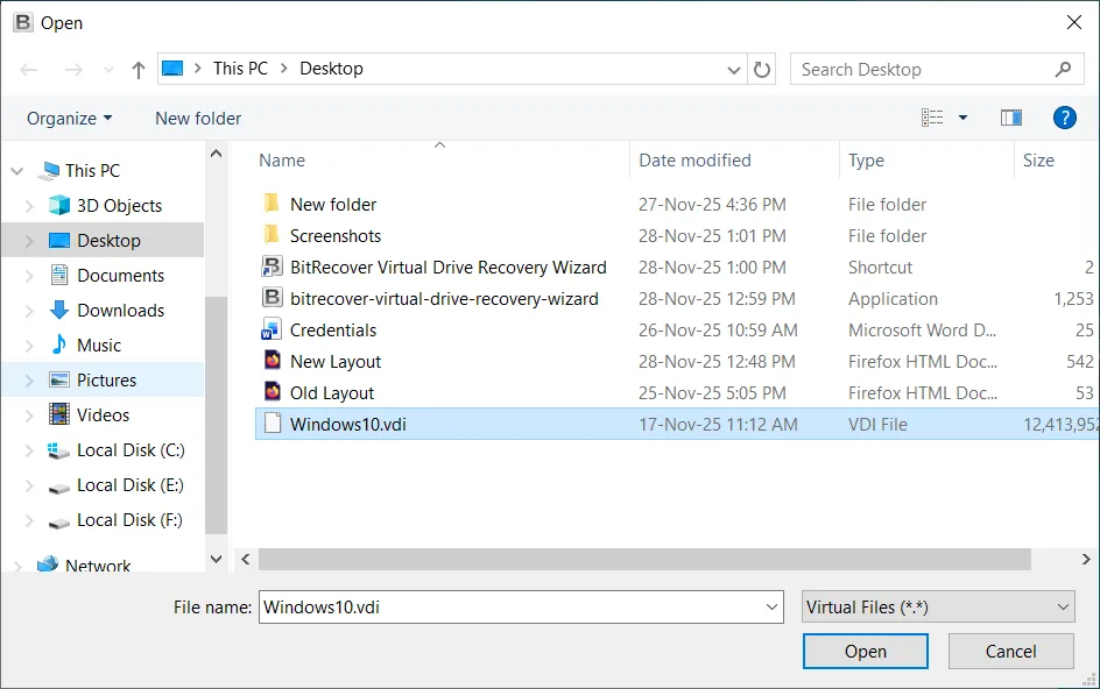
- Open the tool on your host machine.

- Select the virtual disk file (VDI, VMDK, VHD) that VirtualBox can’t boot from.

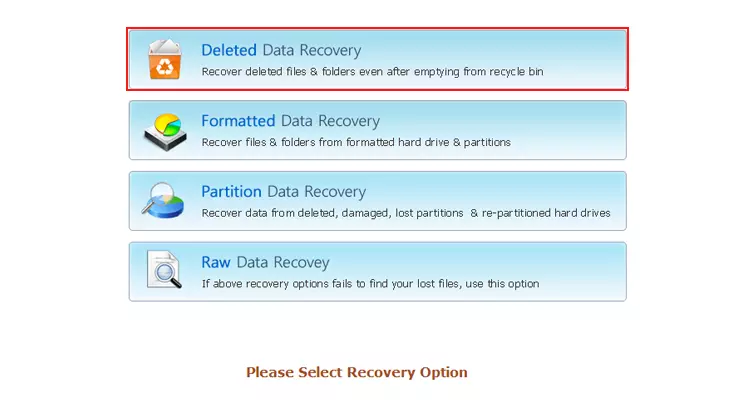
- Choose the Appropriate Recovery option for recovering data from the virtual disk file.

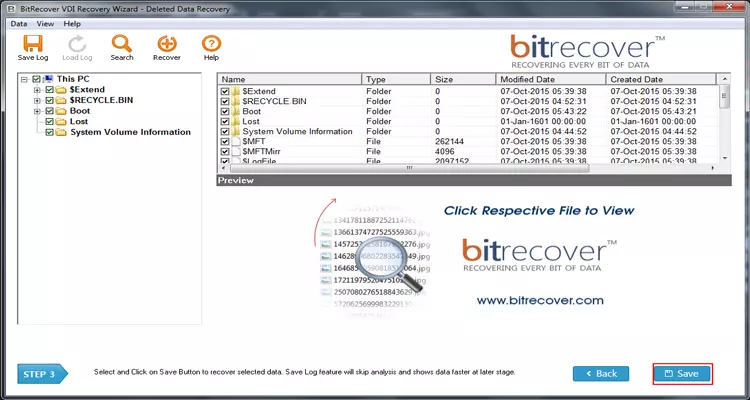
- Select & Scan the Drive Partition and wait while the software finds recoverable files.

- Preview results and choose the files or folders you want to save.

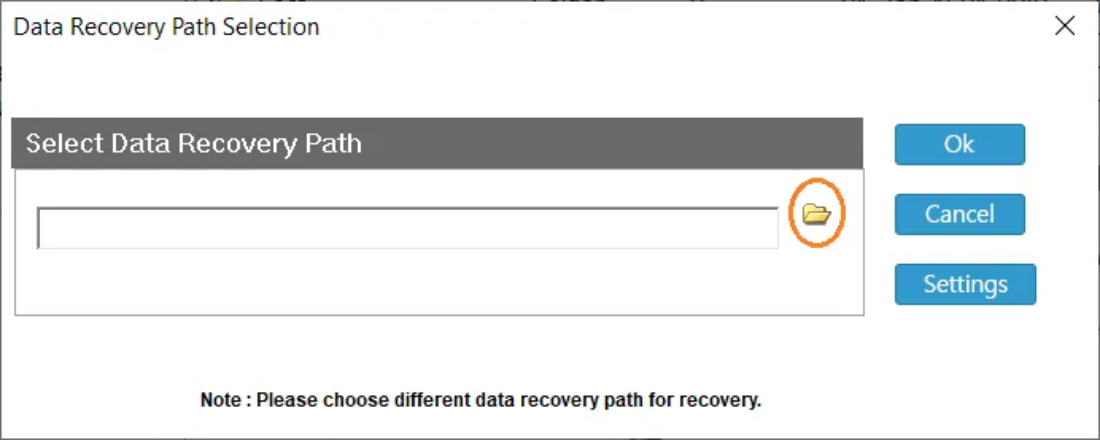
- Save recovered data to a new folder on your host.


Frequently Asked Questions (FAQ)
Q: Why does it say “System Halted”?
A: This is the virtual “blue screen of death.” It means the VM has given up looking for an OS and has stopped all processes to prevent further errors.
Q: Can a corrupted ISO cause this?
A: Absolutely. If the ISO download was interrupted, the “boot sector” of that file might be missing. Try re-downloading the ISO.
Q: Does this error mean my files are gone?
A: Not necessarily. If this happens during an initial installation, there are no files yet. If it happens to an existing VM, your data is likely still in the .vdi file, but the boot instructions are damaged.
Conclusion
The “VirtualBox No Bootable Medium Found” error is a classic hurdle, but it’s rarely a permanent one. By checking your storage attachments, verifying your boot order, and ensuring your ISO files are healthy, you can usually fix the issue in under five minutes.
However, if your virtual machine contains critical data and refuses to cooperate despite these fixes, don’t risk further damage by “tinkering” too much. Reliable solutions like BitRecover Tool provide a safety net that ensures your work isn’t lost to a technical glitch.