How to Export IMAP to MBOX Format: An Advanced Guide

Want to ensure that you have a secure backup of important emails of your IMAP account? The idea to export IMAP to MBOX is one of the best ways to safeguard your business and personal communion history. Many users deal with large amounts of data and want to manage them in an organized way for future needs.
This guide will cover all the reliable methods to export IMAP to MBOX efficiently including a professional solution for quick and risk-free migration. So, stay with us till the end for accurate and perfect results in no time.
Why Export IMAP to MBOX? – Reasons
Before diving straight into the methods, it is essential to know why users prefer to migrate IMAP to MBOX. Here are some of the main reasons.
- Exporting IMAP to MBOX format helps in storing emails locally to prevent accidental deletion and maintain data security.
- MBOX is supported by many popular email clients which makes it easier for users to move IMAP emails from one email service to another.
- Once exported IMAP to MBOX you can open and access files anytime even without a stable internet connection. This helps users working in areas with poor connectivity.
- Moving older emails to MBOX helps in freeing up storage space as sometimes email servers can slow down due to overload of emails. This will enable users to keep the server running smoothly.
- MBOX file helps in keeping a secure archive of emails at one place that helps enterprise level users for record maintenance.
Manual Method to Export IMAP to MBOX
- Open Thunderbird and go to File > New > Existing Mail Account.
- Now, enter your email address, password and IMAP server credentials.
- After that, navigate to Menu > Add-ons and Themes and add ImportExportTools NG add-on in Thunderbird.
- After this, restart your Thunderbird account.
- Right click on the email that you want export.
- Select ImportExportTools NG > Export Folder > Export as MBOX file.
- Lastly, choose the destination path and save the file on your system.
While this is a free of cost method it comes with multiple drawbacks that we have listed in the below section. Read them before choosing the manual method as the perfect choice.
Limitations of Manual Method
- It is a time-consuming process as users will have to export IMAP to MBOX one by one.
- It does not support bulk migration, which can be lengthy and frustrating for users who are having large mailboxes.
- Not an ideal method for non-technical users as it includes several technical steps.
- Users cannot filter their IMAP account emails for selective export.
Export IMAP to MBOX Easily with a Professional Application
The BitRecover IMAP Mail backup tool is the easiest solution for every novice as well as a professional user. With the help of this utility, one can easily import IMAP emails to MBOX format. One can backup IMAP to MBOX in a selective manner by date range, subject, email address, etc.
The tool comes with a simple-to-use interface and can efficiently backup IMAP emails to MBOX format with attachments. The software gives a feature to export multiple IMAP account data to MBOX files.
Take the help of a free trial version of the tool to convert IMAP server to MBOX files. It permits to export top 25 IMAP server emails to MBOX format. For converting unlimited emails, you need to buy the licensed edition of the software.
Steps to Backup IMAP Emails to MBOX
- Download & Run IMAP to MBOX Converter Tool.
- Enter IMAP server account login details.
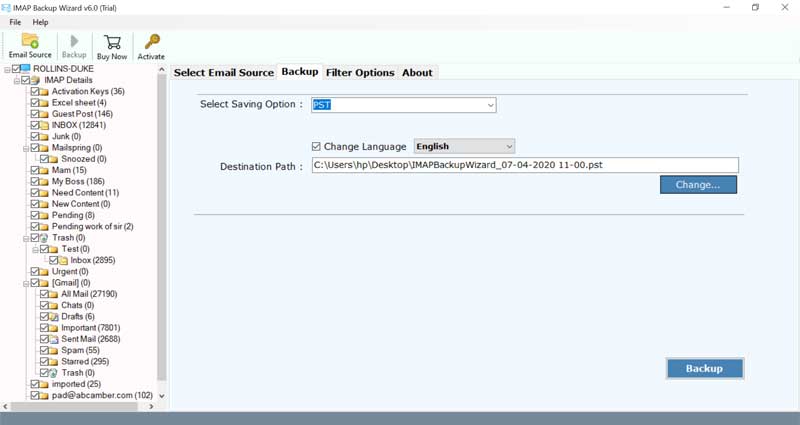
- Select required IMAP mailboxes from the left side panel.
- Choose MBOX saving option & a destination path.
- Start to backup IMAP to MBOX files.
How to Import IMAP Server Account Mailboxes to MBOX?
Users have to follow these guidelines to export IMAP to MBOX format. First of all, download and install the software to backup IMAP emails to MBOX on your Windows or Mac machine.
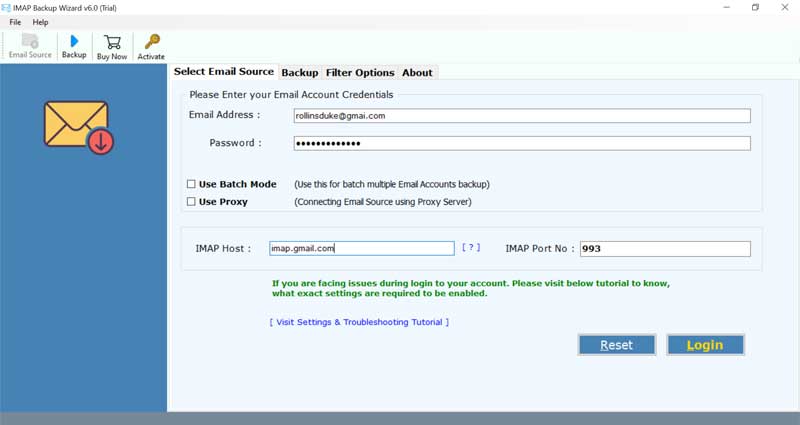
- Now, enter the email address and password of your IMAP server account. Specify the IMAP host, IMAP Port No. in the respective fields.

- Then, select the required mailboxes whose data you want to export IMAP to MBOX file with attachments.
- Thereafter, choose MBOX as the file saving option.

- Also, browse a destination location for saving the IMAP to MBOX converted messages on PC.

- Lastly, click on the backup button to start exporting IMAP to MBOX format.


Top Benefits of Tool to Convert IMAP Server to MBOX
- Different Filter Options: This software facilitates the option to export IMAP to MBOX in a selective manner. It offers many data filter options such as date range, email address, and so on.
- Export Multiple IMAP Account Emails to MBOX: The IMAP to MBOX offers an alternative to move multiple IMAP server account emails to MBOX files. To do this, the user requires to specify the different IMAP server account credentials in a CSV file and upload it into the software panel.
- Move IMAP Emails from any Email Account: With this application, one can export IMAP to MBOX with no limits. You can backup local IMAP emails to MBOX files with attachments.
- Easy to understand User Interface Panel: This IMAP to MBOX tool never stores the information in the UI. It is an expert application that gives 100% exact outcomes without losing any information.
- Maintains Email Elements: It flawlessly keeps intact all email attributes such as the mail headers, subject, attachments, images, hyperlinks, etc during the export of IMAP emails to MBOX.
- Compatible with all Windows and Mac: It supports all variants of Windows OS such as Windows 10, Windows 8.1, Windows 8, Windows 7, Windows XP, Windows Vista, and so on. Likewise, one can launch the Mac version of this tool without any problem.
Conclusion
In the above write-up, we explained the best way to export IMAP to MBOX. The software recommended in this post is highly efficient and gives favorable outcomes. There are no errors with this tool so you can use this application without any worries. In order to resolve your queries, do contact our support team.
